

What is Angular? and Why is it being used?
November 23, 2021
Flask based API development
November 23, 2021
Django Rest Framework
Django REST framework is a powerful and flexible toolkit for building Web APIs. REST is a loosely defined protocol for listing, creating, changing, and deleting data on your server over HTTP. The Django REST framework (DRF) is a toolkit built on top of the Django web framework that reduces the amount of code you need to write to create REST interfaces.
API Introduction
API services allow applications to connect to other applications using JSON-encoded data. Create an API once, and consume it from any API client or front-end application.
Why should we use Django Rest Framework
- Code usage is reduced drastically when you use Django Rest Framework to develop APIs.
- The Web browsable API is a huge usability win for your developers.
- Authentication policies including packages for OAuth1a and OAuth2.
- Serialization that supports both ORM and non-ORM data sources.
- Customizable all the way down – just use regular function-based views if you don’t need the more powerful features.
- Extensive documentation, and great community support.
- Used and trusted by internationally recognised companies including Mozilla, Red Hat, Heroku, and Eventbrite.
Main Use Case
- Django rest framework is used to create webAPIs. Which can be used in mobile applications
- APIs created with Django Rest Framework can be integrated in web applications with Frontend Technology like reactjs, angularjs or vue.js.
SPAs
Modern web applications are increasingly built as Single-Page-Applications (SPAs) which feature a distinct frontend and backend. As opposed to the traditional monolith approach in Django itself–and other web frameworks like Ruby on Rails.
SPAs require a backend API that can then be consumed by multiple frontends as needed.
This approach works well when a company needs multiple frontend applications. mobile web, iOS, Android to run off the same database. It is also arguably more “future-proof” since the frontend can change to whatever the flavor-of-the-month JavaScript framework is, but the backend remains stable the whole time.
The downside is that it takes more time and code to create a separate frontend/backend for projects.
How It is Different from Django
- Django is a high-level Python web framework that encourages rapid development and clean, pragmatic design. While Django Rest Framework is used to create APIs.
- Django Rest Framework is an extension of Django for developing REST APIs. APIs developed with Django Rest Framework contain far less code compared to developed in django.
Who is Using Django Rest Framework
Many Companies using Django Rest Framework including some of most popular are Robinhood, UpstageAI, and Bepro Company

Installation

Prerequisite for Django Rest Framework
You’ll also need some experience with Python and Django.
Practicals (Hands on)
If you want to try the django rest framework, you can do a quickstart or follow a detailed tutorial.
Project setup
Create a new Django project named tutorial, then start a new app called quickstart.

It may look unusual that the application has been created within the project directory. Using the project’s namespace avoids name clashes with external modules (a topic that goes outside the scope of the quickstart).
Now sync your database for the first time:

We’ll also create an initial user named admin with a password of password123. We’ll authenticate as that user later in our example.

Once you’ve set up a database and the initial user is created and ready to go, open up the app’s directory and we’ll get coding…
Serializer
First up we’re going to define some serializers. Let’s create a new module named tutorial/quickstart/seriali
Notice that we’re using hyperlinked relations in this case with HyperlinkedModelSerializer. You can also use primary key and various other relationships, but hyperlinking is good RESTful design.
Views
Right, we’d better write some views then. Open tutorial/quickstart/views.py and get typing.

Rather than write multiple views we’re grouping together all the common behavior into classes called ViewSets.
We can easily break these down into individual views if we need to, but using viewsets keeps the view logic nicely organized as well as being very concise.
URLs
Okay, now let’s wire up the API URLs. On to tutorial/urls.py

Because we’re using viewsets instead of views, we can automatically generate the URL conf for our API, by simply registering the viewsets with a router class.
Again, if we need more control over the API URLs we can simply drop down to using regular class-based views, and writing the URL conf explicitly.
Finally, we’re including default login and logout views for use with the browsable API. That’s optional, but useful if your API requires authentication and you want to use the browsable API.
Pagination
Pagination allows you to control how many objects per page are returned. To enable it add the following lines to tutorial/settings.py

Settings
Add ‘rest_framework’ to INSTALLED_APPS. The settings module will be in tutorial/settings.py
Okay, we’re done.
Testing our API
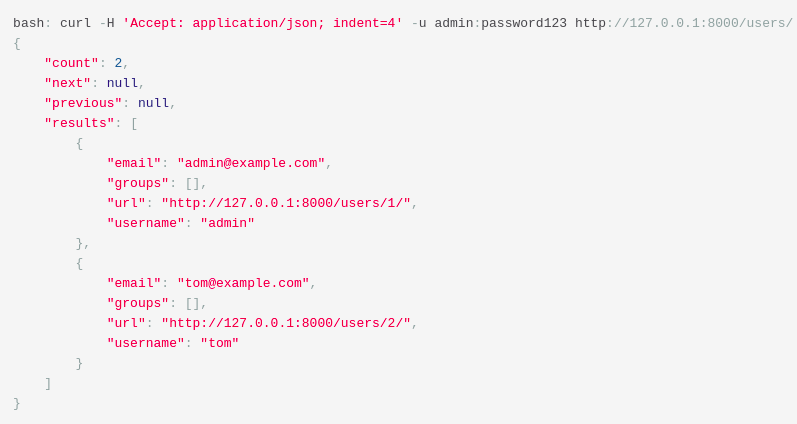
We’re now ready to test the API we’ve built. Let’s fire up the server from the command line.

We can now access our API, both from the command-line, using tools like curl…